Not only have a I made a return to The Shy Lion, fittingly, my appetite for crochet has also returned. It had a been a long time since I’ve made any crocheted critters, with most of my crafting being either sewing (I’ve been particularly enjoying English Paper Piecing, although I don’t have too much to show for it) and knitting.
I was tidying up the cupboard in my office a few weeks ago, and I found the beginnings of a little critter that I can’t even remember starting. Who knows how long this little half-a-head had been all snuggled up in a project bag, patiently waiting for me to pull it out again and finish it? Not me.
And so, with some encouragement from Wonderful Timothy, I fished out my hooks and got back to work.
I was kind of surprised and kind of not surprised that the weirdest thing about coming back to crochet after all that time was doing the magic ring. I think that when you learn crochet, the magic ring is the most awkward thing you’ll ever have to learn, I’ll tell you that much for free! Even though the muscle memory was still there, it felt so unnatural and strange again, and not like the second nature autopilot situation it used to be for me. I was back in my old stride before long, but I did find that interesting. You can find my tutorial for the magic ring here, but I think I’ll re-make it at some point cuz the talk-y parts are so cringe-inducing! I recommend skipping ahead to 1:48. lol
When I crochet a critter, I rarely know what they’re going to be until I’m ready to put their face on. I’ll do the face first and see how it turns out, and I’ll look at their little punim and see what my waters tell me they should be.
With this one, I still wasn’t sure. I began making the legs, but then… nup! These aren’t legs! They’re ears! And so they became a wee little bun!
I made their tail with a tiny pom pom maker, and did as many wraps as I could to make sure it was as fat and squishy as possible, and then they were all done.
Welcome to the world, woolly bunface!
— Raynie
°•°• Project Details •°•°
Pattern — none
Hook size — 3.25mm
Yarn — Morris Estate 10ply in Rustic Aubergine [buy]
If you’ve been with me a while, you may be wondering what I’ve been up to since The Shy Lion quietly snuck off of the internet for a while.
Well, mostly some bigger life things… quit and starting jobs, a blink-and-you’ll-miss-it trip to America, and an interstate move back to my hometown to be nearer my folks. Oof! These things don’t seem that outlandish spread over a couple years, but, y’know that feeling when you take a tumble, and once you get back on your feet you’re a bit discombobulated and confused and thinking “what just happened…?”? Well, I feel like I’ve been stuck in that feeling for the last two years or so, and am finally starting to get my senses back.
But, this blog isn’t about my silly ol’ scatterbrain, it’s about crafts! And as my first proper post back, I wanted to share with you something I made recently that I’m especially proud of.
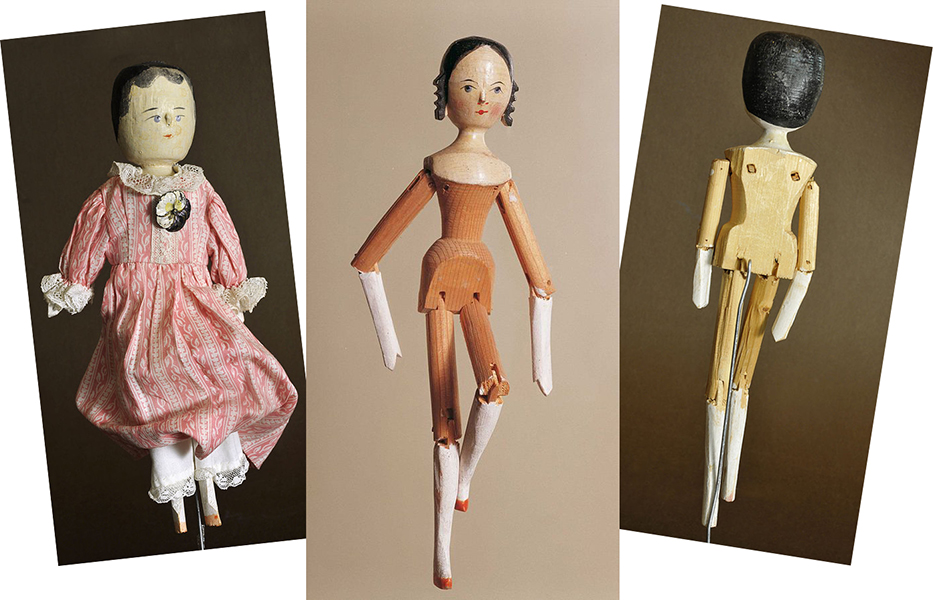
I’ve always loved dolls, even when I was a small wee thing, and especially old dolls. Peg wooden dolls, or Dutch dolls also held a particular fascination for me. You can find out more about this history of these wooden pretties on Wikipedia here.
Historical examples of Dutch dolls (also known as peg wooden dolls) Photographs by Wolfgang Moroder
I love their simplicity and find their sweet little painted faces so charming. And, more and more often I began thinking… y’know, I think I could make something like that.
And so I did!
I had recently bought an off-brand Dremel since I don’t have a workshop appropriate for larger power tools, and figured it would be perfect for the smaller scale projects I prefer. I bought a block of balsa wood to start with – it’s a little soft, but I thought that would be better for my first attempt – and Pa gave me some dowel.
I sketched some concepts, and made some paper templates to copy onto the wood block, and then I got carving. I used the Dremel to cut the doll piece off of the block, and then did the bulk of the carving with a utility know. Once it was almost there, I went back to the Dremel to smooth it all out and add details.
With the main body and head done, I started on the legs, also from balsa, and worked out the joints. I just used tooth picks as the pegs to secure the joints.
For the arms, I made these out dowel, and I did the elbow joints more or less the same as I did for the legs, but for the shoulder joints, I had trouble finding details images of how these were done historically. Some just seemed to be a pin allow up and down movement, but no rotation, but others seemed to have the range of motion, at least to a degree. So, I did some experimenting and came up with my own join. She can move her arm up and down, and rotate it 360 degrees.
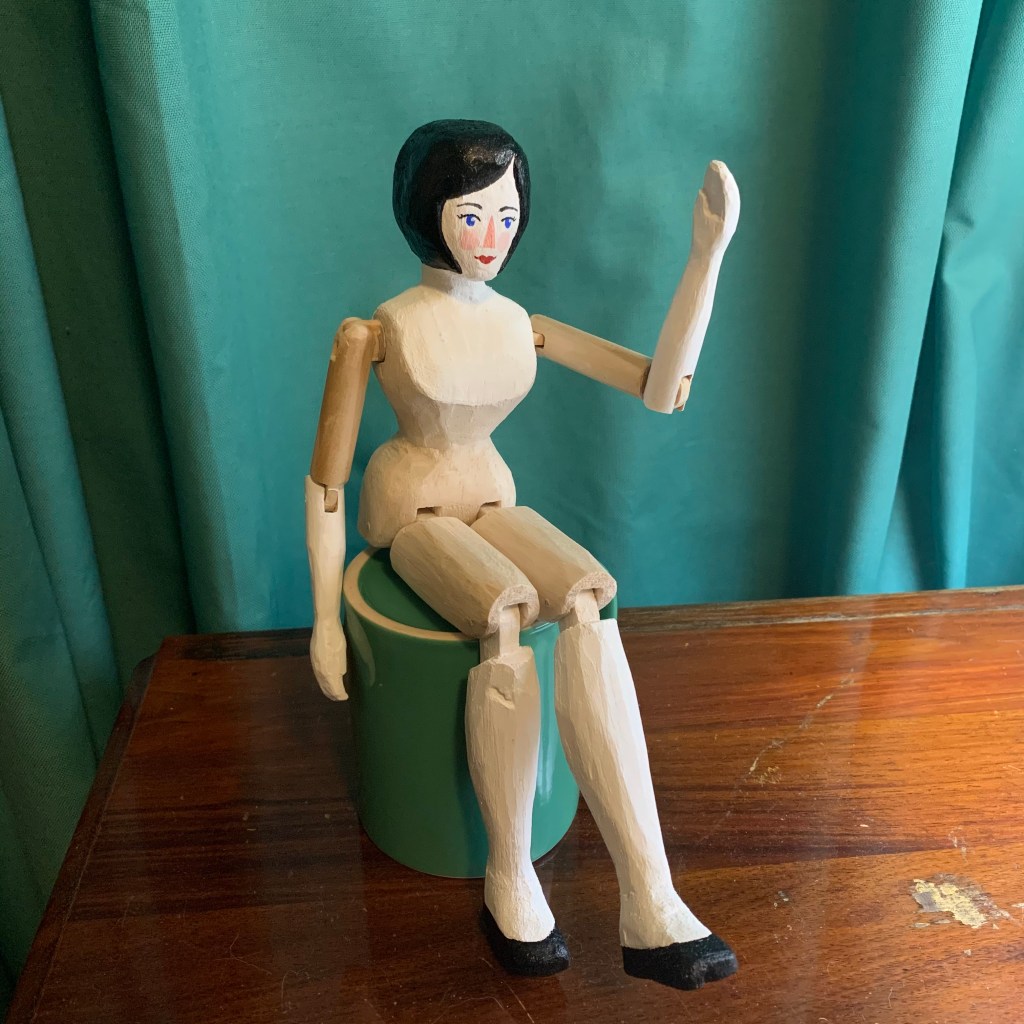
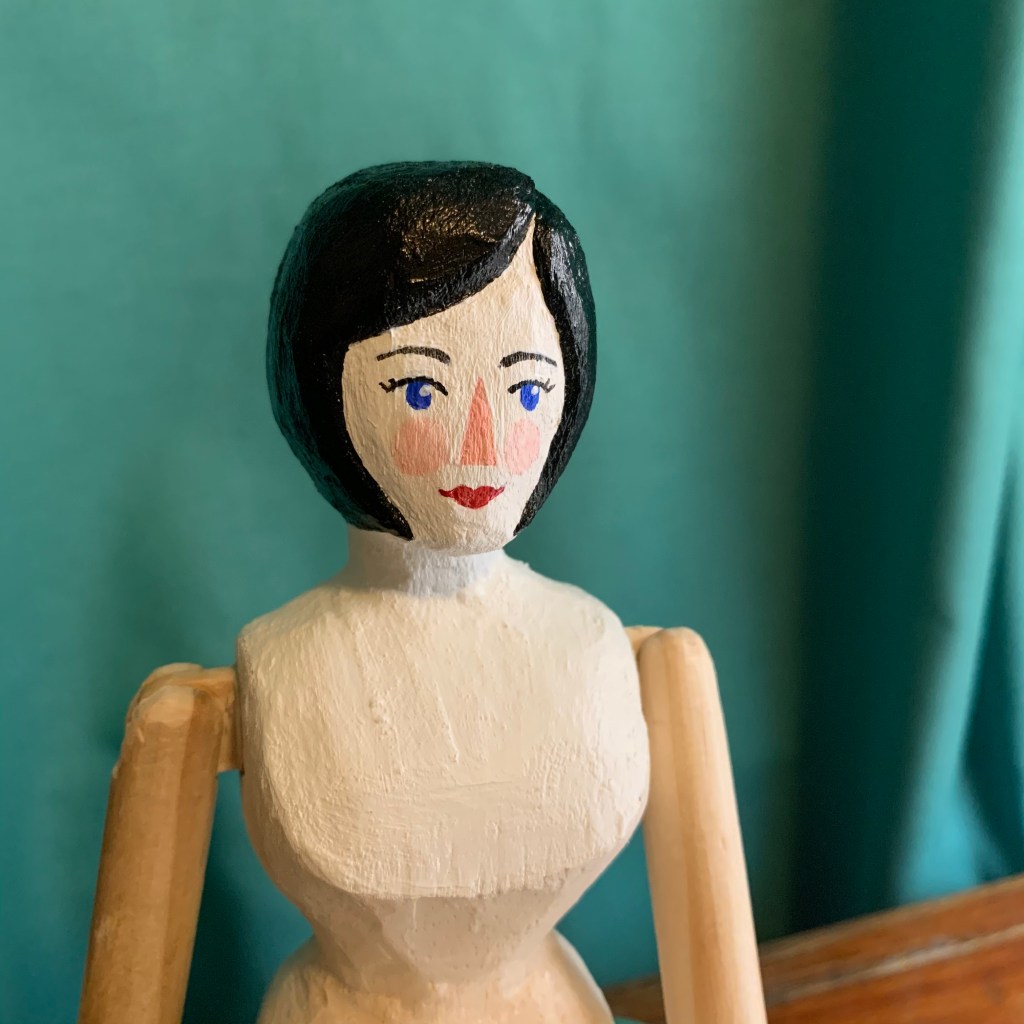
Gerda’s finished body, but her old head
I was mostly pleased with how the she turned out, but I had began to realize that the head was a bit too much of a departure from my historical inspiration, and I began to really dislike it (although, she was serving me Lady Mary from Downton Abbey vibes, which I couldn’t be too mad at) and so… off with her head!
I cut away her head to leave a big stump extending from the neck and carved a new head from the left over balsa. I painted the new head and attached it, and I was much, much happier!
Gerda’s new head.
And then, she needed some clothes. I looked up a bunch of historical and new examples via Google images and Pinterest. I decided not to copy any particular dress or try to aim for anything particularly historically accurate, but I decided upon bloomers, a camisole or corset cover, a petticoat, a dress, and a pinafore. And so I sewed.
I made them all by hand, because I figured it would be easier that machining it at this scale. Plus, I just wanted to go slow and enjoy the process.
I created a pattern for the bodice by wrapping her torso in cling film and plastering it with strips of masking tape. Then, I sketched where I wanted the seams to be and carefully cut it off her down the middle back. Then I was able to cut out the pieces, flatten them out and work out where the darts should be. After a few mock ups, I had a bodice pattern that worked for the camisole and the dress bodice (though for the dress I made some minor modifications to create some ease to accommodate the under garments).
The bloomers, petticoat and camisole came together very quickly. I did originally put snaps on the camisole closure, but I replaced these with very thin, fine Velcro to reduce the bulk beneath the dress.
The dress took much longer, since it took me some time and few attempts to figure out the sleeves, but I was ultimately extremely happy with it. I thought I had taken care with laying the pattern pieces on the check, but I messed it up a bit and it’s not as neatly centered at the front as I had meant to. I did think of re-cutting it, but I was worried about having enough fabric so plowed on. I had to re-cut the collar a few times to get it right, and it’s still a bit odd and awkward, but I actually kind of like that. I finished the dress off with some small hook-and-eyes for the fastenings.
I did the pinafore last, and after the camisole, petticoat, it was pretty straight forward. I had wanted to put some lace or ruffles on the shoulders, but I decided against it. With all the layers, she was already starting to get a bit bulky, and figured the shoulder ruffles would just be a bit much.
Garment progress
As I finished each garment, I steamed them to remove the heat-sensitive ink I used for marking out the pieces and to help soften the quilter’s glue pen I used to baste the seams. Then, I put them in a Pyrex bowl with some fabric softened and gave them each a right good shaking to give them a quick wash and clean out the glue, and then another good shaking in fresh water for a rinse.
With all that done, she was ready to get dressed, and honestly, while I’m all too aware of the mistakes and things that missed the mark, overall, I’m very pleased with her! It took me a few days after finishing her and her clothes before the right name came to me, but I settled on “Gerda”, and I think it quite suits her.
Gerda says hi!
I’m definitely keep to make more wood dolls; certainly of the Dutch doll style, but perhaps I’ll branch out to other styles as I get more confident.
I realize that this post was perhaps a bit dry, but I just wanted to start documenting the things I’ve made recently. It’s been so long that I don’t feel quite as confident as I used to with writing these posts, but I’m sure I’ll find my feet again soon enough.
I hope you enjoyed my little journey to bring Gerda to life! Are there any historical toys or treasures that have always fascinated you? Have you made toys similar to this? Let me know in the comments!